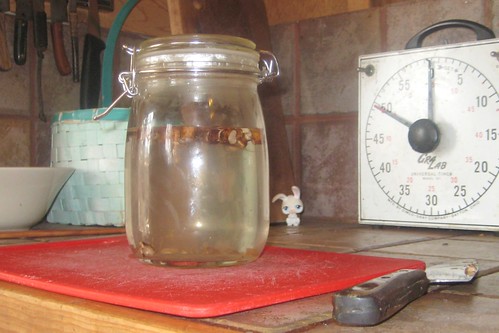
On day 4, we started getting fizzy noises when stirring the dandelion root mixture, so I stuck it in the fridge until we're ready to use it. We're waiting on sugar, as we don't actually have any in the house, and honey apparently doesn't work well for this application, given its antibacterial properties.
I think we're starting with just a liter. I have a hard time believing this will actually work, both in general and after the refrigeration, though everything has gone swimmingly so far. Since we're using an extract for flavoring, making a tiny batch shouldn't be much of a pain.
Thursday, April 28, 2011
Friday, April 22, 2011
Dandelion Root Beer, Day 3 - Bubbles!
The instructions for creating the starter said that it would take about a week for the fermentation to start.
Yet here we are, on Day 3 of the Great Dandelion Experiment, and we have bubbles!
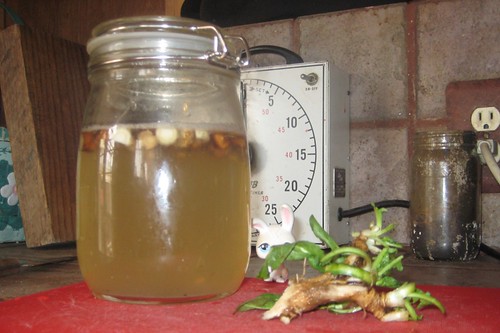
See all that little foamy stuff up around the top? That's what we want!
It smells right, too (kind of a sweet/sour yogurty smell).
I had my doubts about whether this would work, between using spring dandelion root and having fake maple syrup with preservatives in it as the sweetener, but it appears to be doing what it's supposed to be doing!
I decided to cover it with plastic wrap instead of closing the lid, just in case it became too pressurized.
I think we're going to give it at least another day or two, because I have a bit of a hard time believing it's actually all ready that fast.
Today's root was neat - the single taproot branched into three separate-appearing dandelions.
For those concerned about the time investment, so far this has taken approximately 10 minutes per day. It would take 2 minutes if I was using ginger, not digging up dandelions.
Should your young kids happen to be interested in Science and/or learning to read, Secular Homeschooling is giving away The Quirkles - an integrated science/phonics curriculum.
Yet here we are, on Day 3 of the Great Dandelion Experiment, and we have bubbles!
See all that little foamy stuff up around the top? That's what we want!
It smells right, too (kind of a sweet/sour yogurty smell).
I had my doubts about whether this would work, between using spring dandelion root and having fake maple syrup with preservatives in it as the sweetener, but it appears to be doing what it's supposed to be doing!
I decided to cover it with plastic wrap instead of closing the lid, just in case it became too pressurized.
I think we're going to give it at least another day or two, because I have a bit of a hard time believing it's actually all ready that fast.
Today's root was neat - the single taproot branched into three separate-appearing dandelions.
For those concerned about the time investment, so far this has taken approximately 10 minutes per day. It would take 2 minutes if I was using ginger, not digging up dandelions.
Should your young kids happen to be interested in Science and/or learning to read, Secular Homeschooling is giving away The Quirkles - an integrated science/phonics curriculum.
Wednesday, April 20, 2011
Dandelion Root Beer, Day 1
I've become a little obsessed with the idea of lacto-fermented soda. It's soda that's good for you!!! Not only can you make it out of fresh fruit or herbs (preserving some of their nutritional benefits) and include as little (or as much) sweetener of your choice as you want, but you get a dose of probiotics with each serving!
We've made homemade soda before using yeast, so this isn't a totally new venture. In fact, we have spruce beer and sasparilla soda flavoring sitting in the fridge from our last batch. I think we're going to try sasparilla first.
Most of the lacto-fermented soda recipes out there call for ginger root for the starter. This is because ginger, along with many other roots, has a high inulin content. Inulin is a form of starch which is a preferred food source for various forms of Lactobacillus. These are the bacteria that make yogurt and pickles and grow in our intestines, displacing harmful bacteria.
(In a glowing example of the sort of synchronicity which creates naturally occurring unit studies, we recently read The Magic School Bus In A Pickle, which discusses the role of microbes in pickle formation, so this fits right in!)
As far as I can tell, the reason ginger is recommended for this is because it's widely recognized as an edible substance and you can buy it at the store. But it's certainly not the only inulin-containing root, and when "buy it at the store" means a 10 mile round trip that you weren't really planning to do today, you look for more readily available alternatives. And a very readily available alternative is dandelion root, which contain up to 40% inulin. From what I'm reading, this percentage is much lower in the spring than in autumn, as the plant uses the energy stored in the root as inulin to grow new shoots. So we'll see if it works as intended. If not, no big loss - we've weeded the lawn a bit.
Note: In addition to the more variable inulin content, another reason for recommending ginger root may be that dandelions are likely to have been exposed to pesticides and other environmental contaminants (we were careful not to pick ours in the dog yard, for example!), especially in more urban areas. If using dandelions or other wild-growing sources instead of store-bought ginger, make sure that you're reasonable certain your dandelions aren't contaminated. Also, people with ragweed (and, according to LemurDa, salicylate) allergies should be careful with dandelions, as they're common co-allergens. I'm not sure how big a deal that will be for the finished product, as the roots will be removed prior to making the actual soda, but I don't think LemurDa will risk trying this one.
I sent the kids out to dig up some dandelions, not realizing that this isn't exactly a simple task, especially given that LemurGirl has been picking the flowers for her bouquets, making them a little difficult to identify. LemurGirl brought in a few dandelion flowers, and LemurBoy ended up digging out a few root sections about an inch or so long and decided he was done, so I went out, located one, and dug up a good root about 8 inches long.
I washed the roots well, then LB chopped them up into little pieces. I put them in a jar that had previously been used to store sugar, and still had a bit caked onto the sides (recipes say to add some sugar along with the root). Cover the jar (some places say cheesecloth - maybe to let in airborne culture? I just closed the lid, because my understanding is that an anaerobic environment is what we're going for, and that leaving it covered with cheesecloth would be more about letting in wild occurring yeast). Let sit somewhere that maintains a temperature around 75F. Every day, add a little more chopped root and a little more sugar until you start to see bubbles appear (supposedly around 6 days). If mold occurs, skim it off the top, but if it keeps coming back you have to try again with cleaner supplies.
(Note: We're on well water. If you're doing this yourself and using city water, you'll want to either use filtered water or let the water sit out for a few days so that the chlorine in the water has a chance to evaporate.)
To Be Continued... (when something interesting happens, so possibly not for several days)
Friday, April 15, 2011
Chicken Bacon Apple Hash
Inspired by this post on Mothering.com, I decided to use up our leftover chicken and make a slightly more creative than usual lunch.
Chicken Bacon Apple Hash:
Leftover chicken (I used 3 drumsticks)
Apples (I used 2 very small red delicious. 1 normal apple would probably do)
Onion
Bacon (Approximately 2 strips? I dunno. We use the Daily's Ends and Pieces, which are inexpensive, thick cut, and delicious, but don't lend themselves to accurate measuring)
Cinnamon, garlic powder, sage (or whatever other spices you desire)
Chop onion and bacon into small bits, toss into the pan with your oil of choice, and fry for a bit. I just used about a tablespoon of the onion that I'll be frying up to throw in our soup for dinner - I'd have preferred a bit more, but the kids don't like onion. While the onions and bacon are frying, chop the apple into thin slices and the chicken into bite sized chunks. Throw them in the pan along with the bacon and onions. Sprinkle with spices, and stir around until the chicken is adequately reheated and the apples are a bit soft.
This made not really enough for two kids and one adult, but could easily be scaled up (or down).
They both loved it. Boy asked if I could make it for dinner sometime (I can, but it might make for a better breakfast, as originally suggested), and declared it one of his three best dinners. Pretty impressive, seeing as it was lunch. I thought it was good, but would have been way better with a more flavorful variety of apple. I'll definitely make it again!
Saturday, April 9, 2011
More not necessarily Paleo chocolate recipes
Ok, no promises on the perfect Paleo-ness of these, though they're overall healthier than the Jello. They're for a friend with breastfeeding food restrictions similar to mine. They contain cocoa and sugar. You can replace sugar with whatever sweetener you feel is most appropriate.
But everyone knows mamas need their chocolate sometimes. Even, perhaps especially, those with babies with food intolerances!
I often use half cocoa, half carob, simply because I like the taste of carob, especially combined with chocolate. If you do this (or use all carob), you may need to use less sweetener, as carob is naturally sweet.
These are all peanut/gluten free (assuming you use safe ingredients). I mention clarified butter a few times - this is butter with the milk solids removed. Many people with dairy sensitivities can tolerate it, but if your issue with dairy is serious (or you're vegan), just use coconut oil instead, as it's impossible to guarantee all milk protein has been removed. They behave similarly - solidish at room temperature, quite solid when refrigerated. If using coconut oil, be sure you're using good quality, unrefined coconut oil, and definitely not the stuff from the body care aisle. Egg is included in one recipe (I copied and pasted it before realizing it had egg and decided to leave it), but you should be able to replace it with one of the standard vegan egg replacements (banana, applesauce, flax seed...).
Quick and easy chocolate fix:
I usually use this in my coffee, but have been known to eat it plain, too. It's about the consistency of whipped cream.
Refrigerate coconut milk to thicken. Or, if you use a brand that separates into water and cream, don't bother with the refrigeration and just use the cream. Take a quarter cup or so. Stir in a spoonful of sugar and a spoonful of cocoa. Stir until well-mixed. Taste and adjust quantities as desired. Eat.
Quick and easy fudge (single serving):
1 tablespoon coconut oil or clarified butter
1 teaspoon cocoa
1 teaspoon sugar
Pinch of salt (optional - I didn't need it with my clarified butter version, but it might be necessary for coconut oil)
Mix ingredients together until well blended. Adjust quantities until it tastes right, isn't too dry, and isn't too wet. Chill until solid - this took about 1/2 hour for me. It's very rich - I can't eat the "single serving" all at once.
I shouldn't have invented this recipe. It's a little too easy and tasty.
Avocado-based Chocolate Pudding:
(Are avocados available at reasonable price and quality in the Great Frozen North? I apologize if not.)
1 Avocado
1 tbsp - 1/4 cup cocoa powder (adjust amount to taste based on size of avocado, strength of flavor, and how much you want to hide the avocado flavor)
Sweetener to taste (for sugar, about the same amount sugar as cocoa powder)
1 tsp vanilla extract (optional)
pinch of salt (optional)
A few slices of apple or some raisins (optional, but I feel it improves the flavor and texture. I've seen cooked sweet potato used for this, too.)
Non-dairy milk
Combine all ingredients except milk in food processor or blender (or you can mix by hand if you're leaving out the apple). Process/blend until smooth. If too thick, add non-dairy milk a tablespoonful or so at a time until you reach the desired consistency. Taste and add more cocoa and/or sweetener until you have the flavor you want - if you're saying, "Eww, this tastes like avocado," you probably haven't added enough.
This evolved into...
Spicy Chocolate Avocado Ice Cream:
2 avocados
Approximately equal amounts of cocoa powder and sweetener to taste (I used about 1/4 cup of each. I find plain sugar works best for me - honey doesn't work well with the avocado IMO).
A touch of vanilla
A little salt
1 apple, sliced (I actually used a pear this time, as we were out of apples.)
1 handful of raisins
1 tsp cinnamon
Cayenne pepper to taste (No really, I have no clue how much I used. Start conservative.)
Food process everything together until smooth (if you do the apples and raisins first, then add the avocado, then add the rest, it will probably get smoothest. On the other hand, the slight raisin chunks work for me). Add a little milk (I use coconut milk) to thin to ice cream batter consistency. Put in ice cream maker. If you don't thin it, it works well as a pudding, but it was really hot on the day I tried it, so I made ice cream.
(If you don't have an ice-cream maker, you might be able to freeze it in a thin layer, then break it up and food process once frozen.)
At first taste, the cayenne isn't apparent at all. Then the heat builds up :) I think I got it pretty much perfect, for my tastes anyways - there's definite heat, but it isn't painfully hot, or so hot that it overwhelms the rest of the flavors. I'm very happy with how it turned out, even though spicy chocolate isn't usually my favorite combo.
The cayenne is entirely optional if you don't like hot stuff.
The texture of this ice cream (whether spicy or not) is totally, utterly, amazing. Totally gourmet.
Sesame-raisin fudge:
Based on the recipe at http://goneraw.com/recipe/sesame-raisin-fudge. I used to make these to take on my 20 mile round trip bike ride to school.
1 and 1/2 cup sesame seeds
2 tbsp cocoa powder (original recipe called for carob or mesquite flour)
2 handfuls dried raisins
2 tbsp agave syrup or 1 tbsp honey in a little warm water
juice of one orange
2 tbsp water
cocoa powder for coating
Preparation:
Grind up the sesame seeds in grinder until very fine.
Add cocoa and mix in with your hands rubbing out any lumps.
Add the raisins, agave and orange juice. Mix in well.
Add 1 tablespoon water at a time until you have a dough that can easily be formed into shape. Roll small pieces into balls and place in a box with cocoa powder. Roll balls around until coated.
Birthday Cake:
I made this to accommodate some GF/CF guests at one of Boy's birthday parties. IMO, it turned out way better than the standard wheat-based cake. I make no claims that this is healthy.
1 cup almond flour (ground almonds)
1/3 cup ground flax seed
3/4 cup cocoa powder
1 cup sugar
1/2 teaspoon salt
1/2 teaspoon baking soda
1 teaspoon baking powder
1 teaspoon vanilla
3 eggs (Oops, this has eggs. Try replacing them with some mashed bananas, or a bit more flax seed)
1/3 cup oil (I actually used 1/2 cup, and think it was a bit too much, but it contributed to the wonderful fudgyness. 1/3 cup might still be too much, or might be too little. I think 1/4 cup, as I originally put, would be too little. Might be able to successfully do half and half applesauce or something and oil)
2/3 cup bean puree (can of beans thrown in the food processor)
3/4 cup coconut milk
Combine wet ingredients. Combine dry ingredients. Bake at 350 degrees for 30 minutes, or until it looks done. Makes two 8-inch round pans.
Coconut Fudge:
5 cups dried coconut
1/2 cup honey (or more to taste)
1 teaspoon vanilla
1/2 cup cocoa
2-3 tablespoons water (coffee would probably taste good, too, or maybe non-dairy milk)
1/2 cup chopped walnuts (optional)
Blend coconut in high-powered blender until butter-like (do small batches at a time - keep blending until the contents are no longer in contact with the blender baldes, then shake back down to the bottom and blend some more). Add honey, vanilla, cocoa and mix well. Stir in nuts if using. Spoon into greased pan. Cover with plastic wrap and smooth into a slab about 1/2 inch (1cm) thick. Chill before cutting - if it is hard to cut, let it de-chill a little.
And, of course... my Delicious Chocolate Jello.
Other recipes that look good but that I haven't personally tried:
http://happyherbivore.com/2009/05/vegan-blackbean-brownies/ - I've made the egg-containing version of these, and this is the recipe that is closest to my standard recipe. She replaces the egg with banana. They're especially good with a tsp of instant coffee powder. You could use a GF brand of oats, or presumably replace that with your favorite GF flour alternative. Or possibly leave it out entirely - the egg-containing version didn't use any sort of flour, and was fine that way.
If the batter tastes anything like the egg-containing version, it would work well as a milkshake, too (Uncooked, obviously. Possibly with a little added non-dairy milk if needed).
http://vegweb.com/index.php?topic=24531.0 is another version that suggests applesauce as the egg replacement, which might be a bit more flavor-neutral.
Halvah - http://homemade-recipes.blogspot.com/2010/01/sesame-or-tahini-halva-recipe-how-to.html
http://thehealthyeatingsite.com/chocolate-almond-sesame-halva/
http://www.suite101.com/content/recipes-using-sesame-tahini-paste--halva-sesame-cookies-a274902
This is also a good bet for store-bought (try a middle-eastern food store) - just be sure to check the ingredients, as some types of halvah are made with butter, semolina, or other things you don't want.
Coconut oil fudge:
http://www.thenourishinggourmet.com/2008/12/easiest-healthiest-most-scrmptious.html
http://www.passionatehomemaking.com/2009/12/healthy-homemade-fudge-a-great-gift.html (I'm going to guess this would be improved by a bit of salt)
http://www.freecoconutrecipes.com/recipe_Coconut_Oil_Fudge_with_Nuts_and_Fruit.htm
I also want to try something like this with clarified butter.
Easy Clarified Butter
Clarified butter is butter oil from which all milk solids have been removed. It keeps longer than normal butter, and has a higher burning point, making it better for frying. It is becoming my new favorite thing, as the milk solids are what most people with problems with dairy are sensitive to, including Baby.
Most methods of making clarified butter involve cooking it on the stovetop. This requires attention, which I often have in relatively short supply. However, it's dead easy to do in a slow cooker.
Take some butter. Put it in a jar (you may be able to add some more once the first bit melts, if you can't fit multiple solid sticks in the jar). Put the jar in a crock pot, and fill the crock pot with water until at least half full (obviously, don't cover the mouth of the jar). Turn on low overnight or longer. The milk solids will rise to the top and be all foamy, or (depending on how long you cook it) settle to the bottom.
(I've seen instructions for doing this by putting butter straight into one of those little 1-2 qt crock pots, but we don't have one, so the water bath works for us.)
In the morning, spoon any foam off the top, then pour the butter oil through a fine strainer or cheesecloth into another container. If you want to be extra safe, do this very gently, and don't pour the last bit with the settled milk solids.
Baby tolerates the results without any obvious issue. I wouldn't suggest someone with a more serious allergy try it. Particularly not a life-threatening one.
Sunday, April 3, 2011
You know you homeschool when...
...you make smoothies out of the grape juice, apples, coconut milk, and the boiled cabbage used to make pH indicator fluid so that it won't go to waste.
Bonus: Since the grape juice (hand-pressed from grapes grown in our backyard) is rather brown, the cabbage gives it a lovely artificial-but-totally-natural purple color.
LG declared it better than grape soda.
Bonus: Since the grape juice (hand-pressed from grapes grown in our backyard) is rather brown, the cabbage gives it a lovely artificial-but-totally-natural purple color.
LG declared it better than grape soda.
Saturday, April 2, 2011
Mexican Beef Stuff with Cauliflower Couscous
This was the biggest hit yet, I think. Other than the pi pie, that is. Probably because I didn't attempt to season it myself.
* A Chuck roast. I supplemented ours with about a pound of ground beef
* 1/2 cup broth
* 1 jar salsa (mine was 16 oz. Larger wouldn't be a bad thing)
Put roast in crock pot - on low if it's properly defrosted and you're doing it in the morning. On high if you do it like me and stick it in there straight out of the freezer. Dump broth on roast. Dump salsa on roast. Cook until falling apart.
If you use a larger jar of salsa, you can probably skip the broth. I used the broth because we didn't have salsa at the time I started it. I added some extra water, as well, and it was a bit excessively wet, so I left the lid off for the last hour or so to let it cook down.
Couscous:
This was supposed to be "rice", but I over-processed it, so it was couscous. Oh well. I also made too much - cutting it in half would have been fine.
* 1 head cauliflower
* 1 onion
* several cloves of garlic
* Black pepper and cumin to taste
Dice onion, and fry in a bit of whatever you prefer to fry things in until transparent. While it is frying, food process the cauliflower and garlic until approximately the consistency of rice (or couscous). Toss in with the onion and fry it a bit.
Put meat mixture on top of couscous. Or mix them together, or whatever. Eat.
Everyone ate this. LemurDa said he liked the couscous better than normal rice, but didn't eat much of that part, as he wasn't sure how it was for the low-carb thing (as far as I can tell, it's fine - it's presented as "low carb" rice replacement at least as often as paleo). So did Housemate. LemurBoy said it was awesome (with cheese and sour cream). LemurGirl ate up most of the meat part, anyways. I liked it. Housemate and AutisticGirl liked it.
We'll see how Baby does with the salsa.
I think we'll make it again if Baby can deal ok.
Friday, April 1, 2011
Delicious Chocolate Jello
1 package (4 serving size) Jello, in the flavor of your choice. I used orange this time. Cherry is also good. Sugar-free is probably fine.
1 cup boiling water
1 cup coconut milk (dairy milk, cream, soy milk, or whatever you prefer would probably work)
2 tablespoons cocoa powder
Mix Jello with boiling water as directed.
Mix cocoa powder into coconut milk until smooth. Pour coconut milk into liquid Jello in place of additional water. Stir well. Refrigerate four hours or so.
This has a tendency to separate into layers. If this is not desired, stir after 2-3 hours - when it has some form, but isn't quite set.
It's also tasty this way without the cocoa powder.
If you use a different size of Jello, just adjust amounts appropriately - the milk replaces the cold water.
I admit, I really did just prepared this. That part is not April Fools.
Posting it here, on the other hand...
Should you want to make this in a vaguely more paleo-friendly manner, or at least a healthier manner, use plain gelatin (you could even make it yourself with your leftover bones, but I'm not clear on how to do that and have it not taste like meat) or agar mixed with fruit juice for the gel part.
This is not an April Fool's joke
I'm working on an secular/inclusive CM/WTM-based lit-based curriculum. If you'd like to join in, go to http://livinglit.wikispot.org/.
Subscribe to:
Posts (Atom)